30th September
Should have been doing other things but treated myself to doing some interior work.

Cut the port side bunk front and dry fitted 2 support bulkheads.

30th September
Should have been doing other things but treated myself to doing some interior work.
Cut the port side bunk front and dry fitted 2 support bulkheads.
28th September
Easy satisfying day today.


After fairing the ply from yesterdays gluing (cockpit side decks) I glued the cabin top sides on. I also put fillets on the inside where the ply contacts the stringers and frames and filled the screw heads ready for sanding. It didnt take long as everything had been prefitted and prepared. Next job is to plane the edges of the ply to fair it all in then I think Im going to have a major workshop cleanup. Nice and cosy inside the boat but changing my mind on the interior layout several times a day. Once you actually sit inside it is a lot easier to plan things than just using your imagination. Also got to plan foam and bottle flotation and method to check for water in the compartments and how to remove. Maybe just a simple limber hole with a bung.
27th September.

Sanded epoxy resin from yesterday and painted primer and set aside to dry. Spent some time hand sanding the fillets from yesterdays epoxy work.

26th September
As usual days plans dont go according to plan. Did manage to get some stuff done though.

First I fitted the cockpit side decks and got all the joints faired.

I pre epoxy resin coated the inside of the side decks and set them aside to cure to hopefully sand and epoxy paint prime tomorrow in preparation for gluing on


25th September
Managed to do a bit of epoxy paint priming before wizzing into town to deliver my sister to the airport and checking my friends boat. Got home and started mixing epoxy glue.

First >I glued the lower cockpit sides in - then

Glued the seat backrests in.

Made a cardboard template and cut the ply for the cockpit side decks so I can pre epoxy and paint them before gluing into position.

After barbecue dinner glued the cockpit floor supports into position. Tomorrow more finger skin destruction sanding todays epoxy and then epoxy fillet the joints for reinforcing.
24th September
Didnt get much done in the last 2 days as was busy with other things. I did manage a few minutes here and there.


Also put 5 layers on transom where stabilisers will be bolted through. Then sanded it smooth once cured.

Epoxy primed cockpit bottom sides and aft flotation compartment. Ready to glue the sides in now.

More cockpit bits glued and ready for painting on the inside before fitting. Got to go to the airport and check a boat in the marina tomorrow but hope to get some gluing and painting done.
21st Sept
I see in the race regulations that there is a sponsorship restriction of about 5500 euros and you must be open about any financial support on your blog. I wish I had that support but I am totally self financed as of this moment. I have a link on my blog to a boatyard/ yacht broker in the Netherlands that has given me no financial support and not asked me to advertise them. They gave me fantastic service and a lot of help when I was in the Netherlands so I an hoping that they can get some support from my followers. They went over and beyond to help us to sell our cruiser from which the proceeds are going to pay for this new adventure.
21st September
Today did not go according to plan. Wizzed off to buy a can of spray PU foam - 6.10 euros. Only used a little bit and cleaned the tube and nozzle with acetone for later use.

If there are any leaks / condensation in the aft compartment there are 4 places that water can settle so I filled them with spray foam to epoxy over later. Then prepared glass and set up for doing fillets and glassing after lunch. Got a call from a friend during lunch that needed urgent help on his boat in the marina so most of the afternoon was spent in the marina sorting the issue.

Late afternoon put a bunch of epoxy fillets in the aft section and glassed over foam to seal it.

On the transom I glassed 1000g/m2 over the bottom section of where the stabilizer boards will be bolted on. Hopefully tomorrow afternoon I will pull the peelply off and clean it up and glass some pads on the area of the upper bolts for the stabilizers. Got to go back to the marina tomorrow morning to check my friends boat. (He is in France on holiday at the moment). One more epoxy session in the aft compartment and then can epoxy paint prime. If anybody is wondering why there are black dots in my glass work there is a simple answer. For complicated glass cutting (like in a corner) I make a paper template of the shape of glass that I need including overlaps and place it on the fiberglass roll and put dots in the corners that need to be cut to. That way I can get the most economical layout and also change the bias of the weave to get better strength.
20th September
Seemed to spend a long time in the workshop but didnt accomplish much.


Also pre epoxy coated cockpit stringers and supports so less work in cramped spaces once fitted.
19th September
Spent several hours sanding the epoxy I painted over the last days and skin on my fingers is almost gone.


I also epoxied 1000grams of glass reinforcement on the inside of the transom top corners where bolts for drogue attachment points will be mounted. Still got to add glass reinforcement in the area of the stabilizing boards attachment areas on the inside.
16th September
Nothing too exciting. Spent the morning wearing my fingers out with sandpaper in the aft section sanding all the corners and preparing for epoxy coating all the bare wood.


Epoxy coated all the uncoated ply and stringers aft of the companionway.

Also sanded and coated other side of some of yesterdays bits that need it. Im not pre coating ply that will be glassed over later. Next job will be adding glass and epoxy to reinforcing spots on the inside of the transom area that I would like for peace of mind.
15 th September

Cut ply and fitted cockpit seat sides after sanding the epoxy of yesterday.
.jpg)
>I then removed the whole cockpit for sanding and pre coating with epoxy on the inside.

Panels of plywood getting pre soaked with epoxy. Got to work out which panels I should paint before glueing on. My body doesnt bend into small spaces as it used to 30 years ago.
14th September
Did some things on Nuts today😃. Been almost a week without progress due to a different project which needed a roof before the rain that arrived today.
First job was planeing and ripping some rough pine to make more strips. Big pile of wood shavings on the floor but not worthy of a photo.


Used some of the new strips to continue framing the cockpit. Got them glued in this evening.

I also drilled and prefitted coachroof sides but will only glue them on after cockpit ply is prefitted. The top ply was cut some time ago but I did it just to see how the deck beams faired out. It will only be glued on when the inside is done and painted.
Sept 8th.
Been busy with work but got a few moments to work on keel. Been filling and epoxy priming.


Keel all epoxy painted and faired to a 5 out of 10. Not perfect but good enough for me. Keel plate has zinc spray plus 5 coats of epoxy - where do you stop? It will outlast me.

Dragged keel out of workshop with my ancient Kubota and hung it up on my nice and shiny new scale.
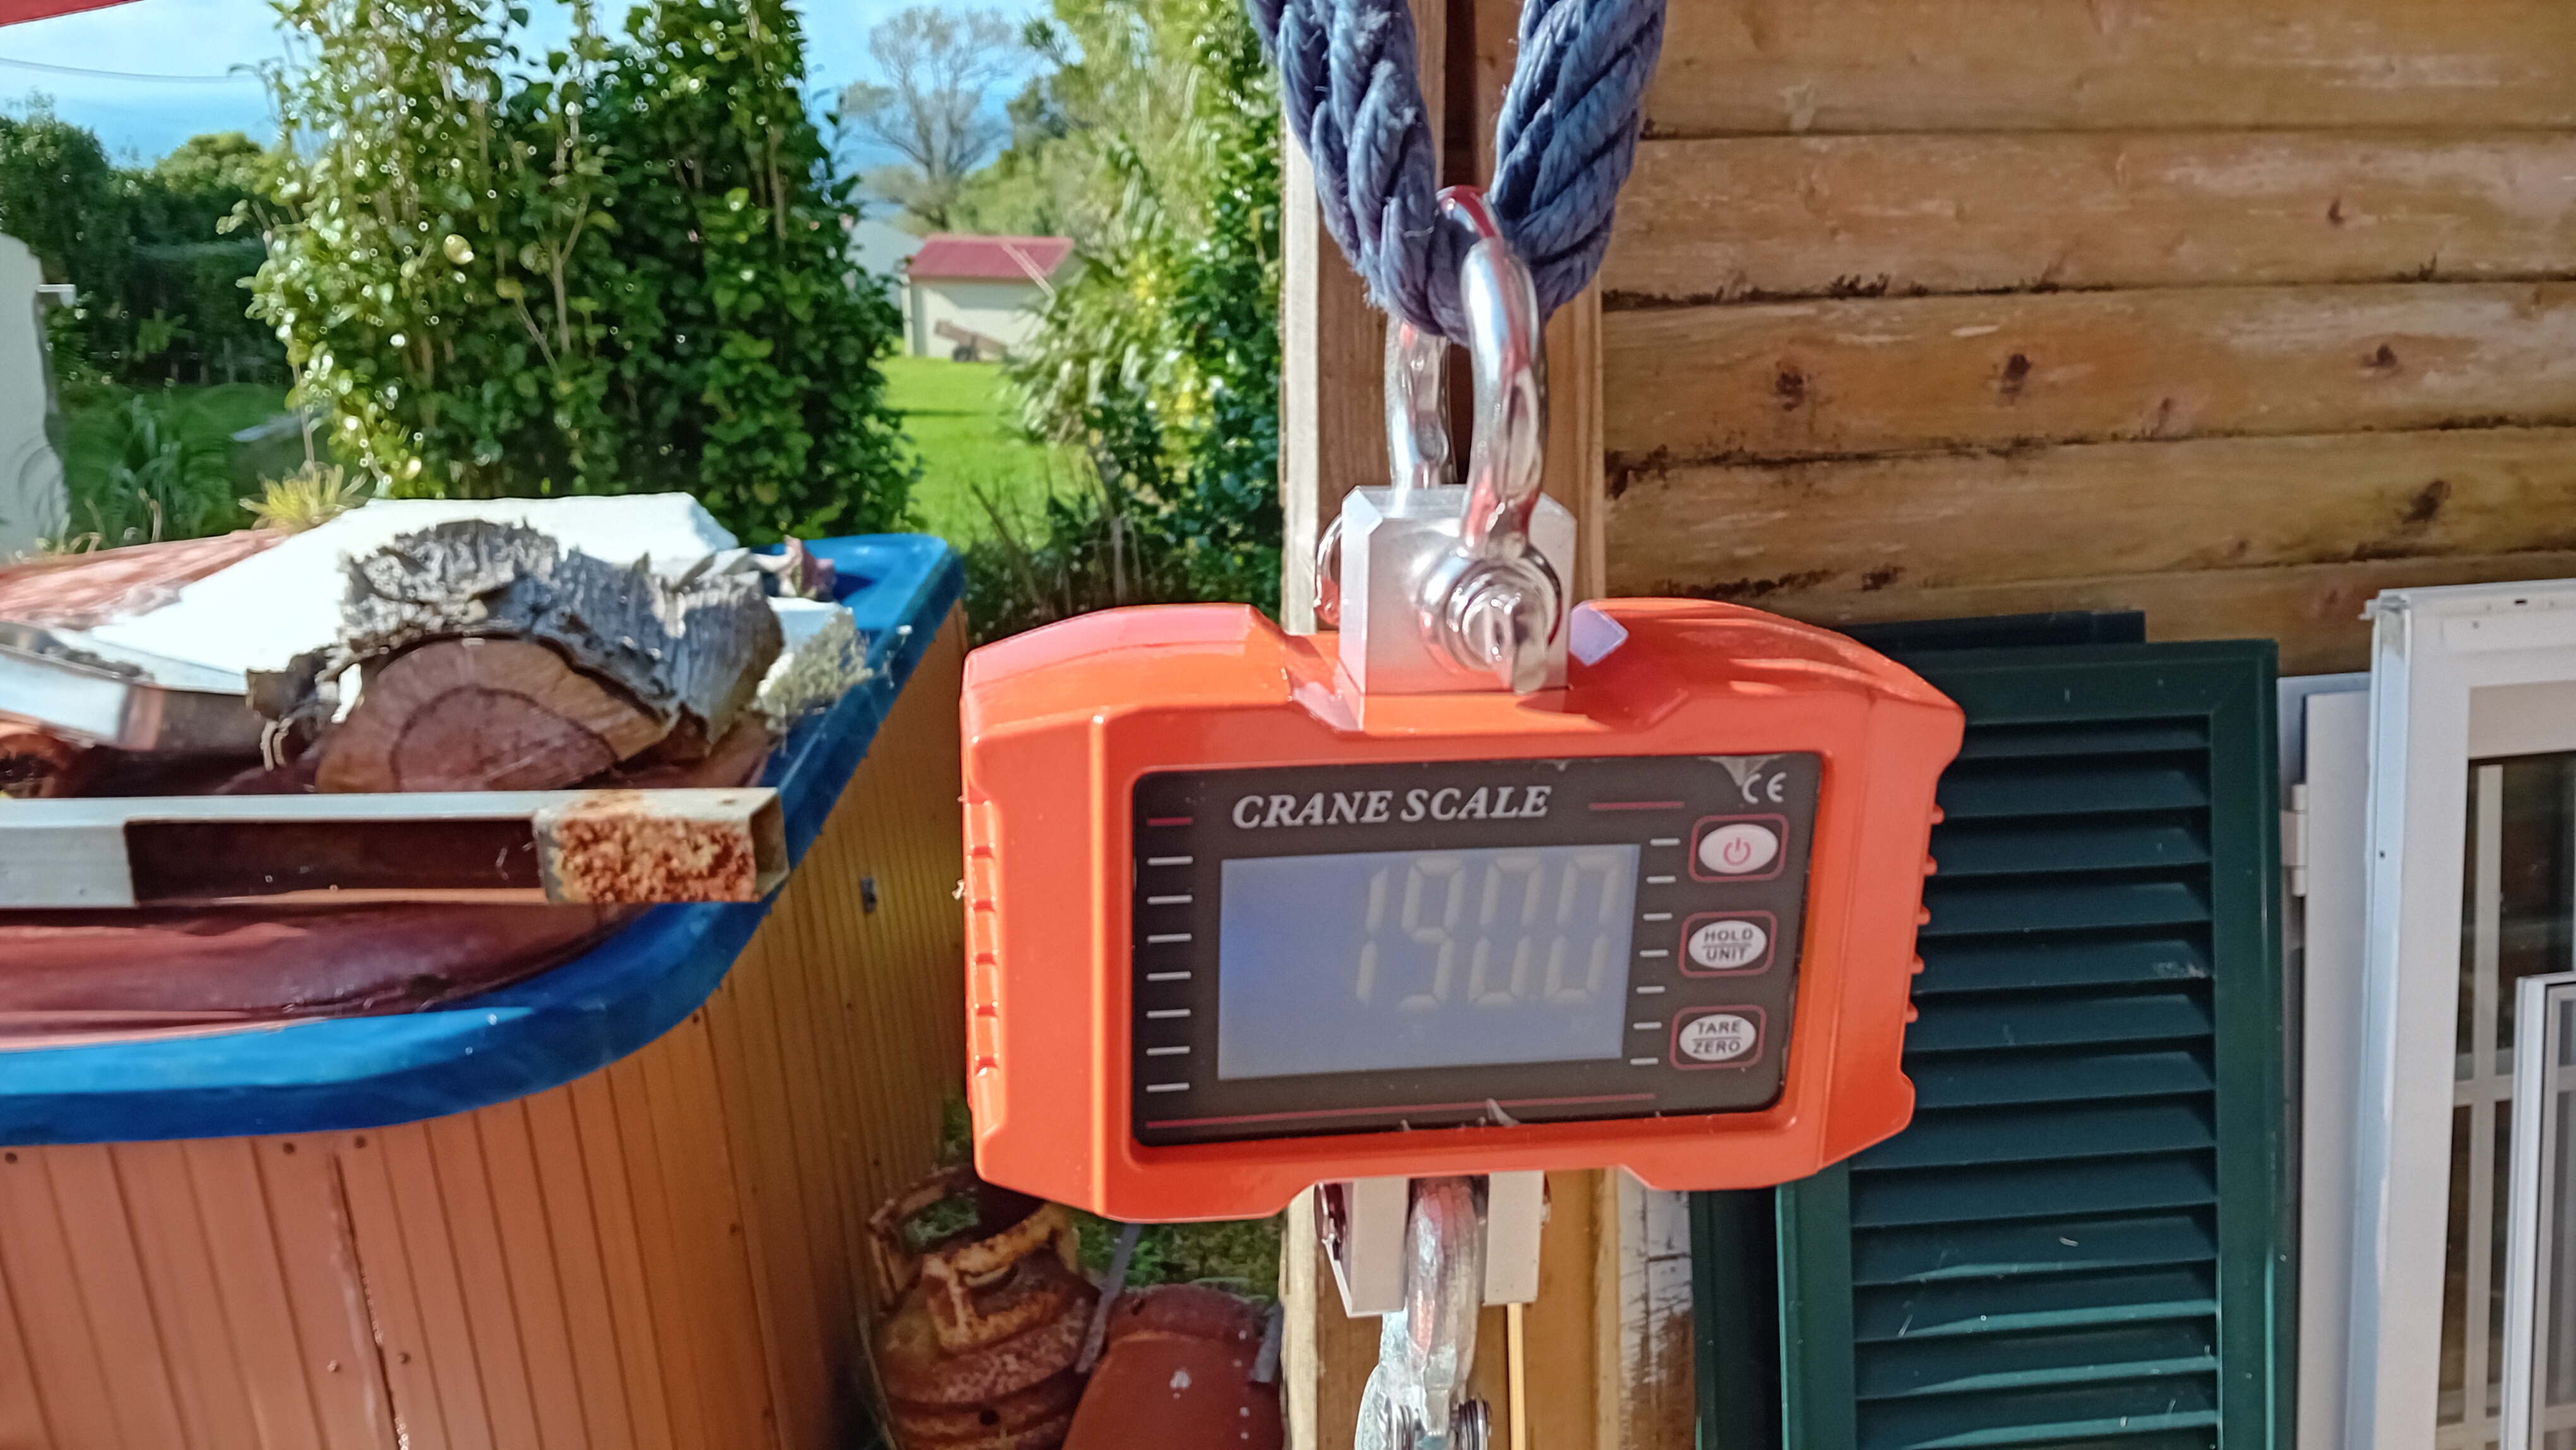
190 KG. including the lifting tackle so a few kilos less but will confirm later. My lead halves were 54 kg each and never weighed the 12mm keel plate and the mounting plate was 6 instead of 5 mm so 2 and a bit heavier. Lots of zinc and epoxy filler and 5 coats of epoxy. I expected it to be a bit heavy but happy with the result. I can stop messing around with the keel now as it is all done and trial fitted and can be set aside till needed. Looking forward to deck sides which are ready to be glued on and starting the interior.
5th September
Was busy with another project today but managed to sneak off into the workshop after dinner.


Sanded glue lines on lead to steel plate ready for filling.
 |
Put epoxy filler over joins and will let cure tomorrow while banging a roof on our new patio. One more sanding on the keel and some epoxy primer then DONE!
4th September

Glued and bolted the lead halves onto the keel plate this morning. Considered using a soft mastic to fix the lead on but decided to epoxy it on. I have no plans in the future to ever remove the lead from the plate so hopefully it is stuck on forever. All the parts were manageable by hand before bolting it all together but burst some blood vessels lifting the keel vertical for the filling process. (Glued and bolted it on its side.)
Next job is to do a touch up filling and sand and slap some more primer on. Then I will weigh it and set it aside till just before launching. I figure it will be a bit overweight. The lead halves were a few kilos over the 50 and used 6mm instead of 5mm for the steel mounting plate also lots of zinc and epoxy. We shall see.
3rd September

Keel plate ready for fixing the lead on. 1 coat zinc spray, 1 coat Cin C Pox epoxy and 2 coats Hempels Light Primer. I will give it a final coat after the lead is bolted on and faired.

Glued the deck beams and stringers on and faired them in. Then cut top and side deck ply. Used 2 sheets with only small offcuts
