27th December

Hope you all had a good Xmas.  I consumed too many calories but had a festive few days so not too much progress.


Next section in forepeak glued in after drilling holes for mast wiring and cutting and fitting forepeak division to prepare for painting before gluing in. 


Galley slowly taking shape.


Still a way to go

 23rd December

As threatened I was up at sparrow fart and on the sea before the sun was up.  It was cold and choppy but persevered.  First squid got demolished on the way up from 240m deep and only got the head and tentacles.  Guess some happy shark is swimming around.  There was plenty of action and caught my 5 quota allowed.  Didnt take long.  Biggest 4.2kg which sprayed ink all over me and the boat.


Smallest just over 2kg.  Spent less than 1 hour on Nuts this evening just hand sanding a few bits and planning the next session.  Early to bed tonight.

 22nd December


Glued, screwed and ran a fillet around the cover of the flotation foam in the forepeak.  The orange nylon strap is under a section of the foam slabs that I can use for pulling them out if needed.  Once a few of the slabs are removed the rest are easy to remove.  The ply in the bow compartment has been epoxy saturated and will be ready for painting once cured and sanded.  The only way to remove the foam in the bow compartment will be with a jigsaw and a lot of swearing.

Weather looks good here for tomorrow so am going to try to head offshore in my little fishing boat and chase some squid.  Freezer getting low!

 21 st December


Filled the bow with foam sheets and then covered over with glued in  ply coated underneath and edges with epoxy to seal it.  Once glue dry can epoxy coat, prime and paint.


 19 th December

Been occupied with seasonal festivities the last days but did manage a bit.


Started fitting and shaping foam in forepeak that will be removable once the ply is epoxied and sealed over the top.  I estimate about 80kg of buoyancy extra once finished as well as in a good place (low down)


Also started filling bow compartment with closed cell foam and fixing in the 4cm thick sheets with spray foam.  You can see the tube on the port side that can be used for checking if there is any water in the bottom as well as sucking/pumping out.  I will keep on going up with foam sheets till the bottom of the inspection hatch / access for bow fitting bolts.  Once at the level of the bottom of the hatch I will seal off the foam.  The tube will allow for expansion / contraction of the remaining air so as not to build up + or -  pressure in the compartment.  Above the bottom of the hatch will be filled with easily removable foam to allow for inspection / service of bow fittings.


Chainplate bolt holes over drilled and filled with epoxy and redrilled and had chainplated refitted.  I will block the holes with plasticine for the glassing and fairing process on the outside when the time comes and just clear out the holes from the inside with a drill when done.

 14 th December.

Had to go to town today so popped into a friends workshop who has a huge hydraulic plate bending machine and put the angles on the chainplates.

 Bow chainplate with 20 degree bend -


Shroud chainplate prefitted with 32 and 22 degree bends for shroud and maybe a lower shroud. (guessed the angles but think they are close)  Lowers not on the plans but might be nice if heading into stormy areas.  Im fitting them now to get the hole positions so I can overdrill the holes with bigger holes to fill with epoxy.  I can then fit the bolts in solid epoxy for final fixing.  Okume plywood is softer than pine ply so am putting an extra 10mm bolt through the sheer stringer as well as having an extra 2 layers of epoxy glass on the outside in the area which you might be able to see in the photo.  I would like to have most of the fittings to be mounted onto the hull and deck made and fitted with reinforcing before glassing the deck.  


Inside of galley box now has its first coat of polyurethane paint.  Light sand and second coat tomorrow.

 13 th December


Galley drawer slides just fine and is nice and square so gave the galley box and drawer a sand and got primer going.


Will give this a sand with 240 in preparation for polyurethane paint.  While waiting for paint to dry I did a few small jobs.


Drilled and countersunk holes in windows.


Glued an aluminium tube in the bow compartment that can be used for testing if there is any water in the bottom once it is foam filled as well as pumping it out.


Started polishing chainplates.  First  sanded with grinder then 220 grit with orbital sander then 400 and 800 grit by hand and finishing with polishing compound on bench grinder with linen wheels.  Can get it nice and shiny but takes a long time.  Going to put the bends in before finishing the polishing.


 11 th December

Spent several hours working on Nuts over the last few days but not much to see.  Finished the painting under the port bunk.


Nice and shiny and happy with the result.


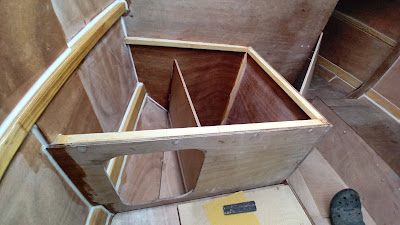
Galley box taking shape.  Took a long time of fiddling to make the drawer runners and locker door frame on the front and epoxy it all into position and make fillets to round off the joints inside.


Drawer frame all glued up and bottom cut.  Can do a trial tomorrow when epoxy hard to see if it fits.  If all is good I can give the inside of the box a sand and a coat of primer.  Then I can move onto some other jobs while I do the painting process inside the galley box so I can glue the top on and then continue building the galley up.


 8 December

Finished with house work for a while.  Fitted outside door handles and handed over keys to new tenants.  That was the last job finished today midday!!!!!

Took a drive down to the cliffs below our house to look at the sea.  Not easy to take pictures as gusting 40kts and only using phone.


There is water being blown off the surface in gusts.  The waves are over 5m but in the photo it looks just fine.  40+ kts of wind.  (just remember that this is not a storm but just a big blow for here).  The IMOCAS are racing passed us now in their single handed  -Return To Base_ https://www.imoca.org/fr/retour-a-la-base

These waves are higher than the length of Nuts.  Nice day for armchair sailing.

Jumped into Nuts late afternoon and epoxied window frames into position and tacked a galley compartment into position.


This is going to be a storage compartment for sleeping gear (sleeping bag / pillow) and there will be a cutlery drawer fitted just to the upper right for wine bottle cork screws and beer bottle openers and maybe some forks, knives and spoons for the occasional food.

Finished with house work for a while so hopefully will be updating with progress on Nuts most days in the near future.

 4th December

Yikes! this year is disappearing fast.  Used to enjoy working on houses but fed up now and just want to work on Nuts.  Got to eat though.

Did manage an hour or so each day of sanding and painting.


Covers of port bunk and locker lids plus some other bits.


Underneath port bunk after 1 coat epoxy resin, 2 coats epoxy primer and first coat of polyurethane topcoat.  Will give it a light sand with 240 grit tomorrow and final coat of PU.  Got to get it on early as humidity going up again.  Had a nice window of low (for here) humidity but going up to 90% for the next days.  Temperature not a problem as can heat my workshop.  If the worst comes to the worst I will just have to run the dehumidifiers.  My limits for epoxy and painting that I have decided on are 70% humidity and 16c temp.  (using specs from materials Im using). Have managed to keep below humidity levels and above temp levels so far.

When you are living in the middle of the Atlantic Ocean on a small island you have to take what you get with the weather.  Mild temperatures but high humidity.  I spend a lot of time looking at the sea and wonder how a 5m yacht will handle what is passing by.  I guess the most seaworthy vessel is a bottle with a cork well fixed in. (just dont hit a rock). Been on a bigger boat in bigger seas and been upside down and didnt like it.

 1st December

Still busy with house work but the humidity was nice and low today so spent a few hours on Nuts this evening.  Ran a heater inside the boat for a few hours to dry out humidity in the raw wood and coated the pine stringers with epoxy resin.


Hull plywood was epoxy saturated before assembly and only had to coat the stringers and chainplate ply doublers.  Going to let that cure and give it a sand and can then start with the epoxy primer paint and polyurethane overcoats.  Only doing below the bunk and inside of galley box for now.  

Still a week or two of house work to do but going to spend some time on Nuts as the humidity is going to be OK for a few days and dont need to run the dehumidifier.  Going to get a bit cold but just fire up the workshop heater which works a treat.

 27th November

Only spent a few hours on Nuts in the last days.  It has been very humid so not doing any epoxy work or painting. (nice and warm though).  I am busy on some renovation work on a house which needs to be finished as soon as possible.  I have managed to do some epoxy work and painting preparation though and as soon as possible I will get the workshop dehumidifier going and make a bit of progress.

 23rd November

Got a few hours of time on Nuts this afternoon.


Window polycarbonate was cut and routed last night and made some frames for the inside today.  Im fitting frames (10mm) on the inside to make the ply thicker for longer fixing screws.  Still have to drill and countersink fixing holes in polycarbonate.


Fitted frames ready for gluing into position (both sides). I will cut the holes with a router once the deck is glassed and faired.


 22nd November

Just got back home after a few days on the island of Sao Miguel helping sister Nuts after getting a brand new airport beep in the security scanner implanted in her hip.  Just checked Nuts and it is "floating" nicely in the workshop waiting for some more attention.  


Attention coming soon!

 18 th November.

Lazy day.


Stbd bunk tops and lockers finished with painting.  Maybe Im going over the top but it makes me happy.  1 layer of epoxy resin (2 in some places), 2 coats of epoxy primer and 2 coats of polyurethane top coat.  All light sanded between coats and done within less than 24 hours between coats (except for epoxy resin coating which was done before building the hull using peel ply.)


Looking inside a locker.


All that boring work and you can see nothing.  Now I can glue the bunk top down and forget.  Going to fiddle with other things more interesting for a bit before I tackle the port side.  This evening I reshaped the windows to get a bit more pleasing shape (for me).  Got very little area for play as limited by the size of my polycarbonate.  Plan calls for 6mm pc. but got 8mm.  Pc. has a lower UV resistance but is many times stronger.  The stuff I got has a UV protection coating which should make it last a bit longer but at least it is bullet proof and stronger than the ply it will be fixed to.  One thing less to worry about in a storm.

 16 th November

Still plodding along with sanding and painting.


Second coat of epoxy primer under stbd. bunk.


First coat of polyurethane paint.  Just using up paint I have and will overcoat with a light grey for the second and last coat.


Managed to buy some polycarbonate for the windows.  No offcuts of 6mm available and didnt want to buy 2 square meters but managed to get some 8mm a bit smaller than I would have liked.  The cutouts in the templates will be the size of the polycarbonate and the actual holes they cover will be a bit smaller.  I also have 2 small deck hatches so there should be plenty of light inside.

 14th November.

As promised nothing exciting is happening.


Second coat of epoxy primer on lots of pieces of plywood (on top of 1 coat of epoxy resin).  Also coated stbd side of cabin with epoxy resin where it has not been covered before.  Painting takes a lot of time with sanding in between and not much to show.

 12 th November.

Relaxing Sunday.  Jumped into bow section (well maybe ambled slowly- very slowly) and gave  the primer a good sand with 240 grit to smooth everything out.


Then painted with 2 part polyurethane paint.  It is nice and shiny and looks good.  The colour is a light grey as it is paint I had left over from my fishing boat.  Going to buy more of the same colour as I like it for the bilges and inside lockers.  The bow and stern flotation compartments might end up in funny colours as I have plenty of dark blue and Turquoise polyurethane paint left over from the same project.  Nobody will see it and it is just for protection.


 Covers for bow section also painted in polyurethane on the underside.  Almost ready for gluing into position and then can move up.  Not much exciting is going to happen in the next days as I am going to concentrate on sanding and painting in non seen places but I will keep updating progress even if it is uninteresting to some.   Also spent much time and glasses of wine sitting inside the cabin planning all the wiring paths as well as plumbing for drainage of compartments, fitments of bilge pumps and battery storage etc, etc,

One very interesting thing has happened,  The Clube Naval de Lisboa has made a potential proposal for starting the Setka Atlantic Challenge in Lisbon and offering all the entrants support before the start.  From what I understand the official start of the Atlantic Challenge is still in Sagres but there is a possibility of a pre transatlantic "race" to Sagres.  Im all for it and going to express my interest and thanks to the Club tomorrow.  What a wonderful place to start the adventure!!

 11th November


After a light fine sand I gave a second coat of epoxy primer to what I painted yesterday as well as some of the stern flotation compartment to use up mixed epoxy primer.  It is my go to area to use up leftovers so as not to waste paint.


Cut and fitted seat reinforcing for starboard side.  Now I can mark the undersides of the cockpit seats so I can mask off the glue contact areas and paint the rest.

 10th November.

Lousy weather in the Azores at the moment.  Nice and warm but windy and rain.  Shut the workshop door and turned the music up and got busy.

First job was to glass the stabilizer fins and then jumped into the bow with sandpaper and gave the forepeak a good sand.  After lunch epoxy primed the forepeak below bunk level as well as the underside of the ply that will be glued on when painting is finished.


The forepeak ply and tabs on the work bench.  Tomorrow I can remove the peel ply on the tabs and clean them up and shape and glass the ends.  Also hoping to give the primer a quick wizz over with fine sandpaper and a second coat.


Set up the anti lung killing ventilation system for epoxy painting in the forepeak.  The end of the tube goes over my head and I get nice fresh air and keep cool with no fumes.


Cut and fitted cockpit reinforcing strips that will be glued in when ready for fixing the cockpit seat.  Still lots of painting and fittings to drill and prepare for mounting before I close up the area.

 November 9th

Been a long time since an update.  Not much progress in the last week.  Mrs Nuts had an operation on  her foot and was / is out of action for a while.  All is good and she should be 100% soon.  Boat building took a back seat for a bit but decided to get back on track now so started making the stabilizing fins. 

Printed a foil section I chose (NACA 0015) to scale and glued the shape to the edge of glued plywood.


I then cut groves with the table saw to assist with shaping.


Then attacked with a nice sharp chisel and block plane, belt and random orbital sander.


All nicely smooth and straight.  Cut the glass and peel ply ready for glassing tomorrow.  

Weather forecast lousy for the next days so can hide in the workshop.  Mrs Nuts semi mobile now so I am redundant in the house. 

 3rd November


Drilled and bolted bottom pintle into position.


Welded up 4mm 316 stainless backing plates and fitted onto web that has a total of 20 layers of glass in this area.  I think the rudder will break before this pulls out.  Once this was all fitted I removed it all and drilled out the 10mm bolt holes to 17mm diameter.


I coated the inside of the holes with epoxy (ply and frame timber) to let it soak into the wood then filled with epoxy mix.  Once cured I will redrill the 10mm hole in the middle.  This way hopefully there is no chance of moisture getting into contact with wood if there was ever a leak past the bolts.


Got to wait for epoxy to cure so faired in the tops of the bulkheads and frames and rebated the ply doubler down the middle of the coachroof.


 1st November

Been busy with other projects but did manage a few bits on Nuts in the last days.  Been playing with stainless steel and welding machine.

Welded up the rudder pintles and cut out the chainplates.  


Bow chainplate is set up for a single or double forestay.  Double will be used for the Atlantic Challenge with hank on jibs and the single forestay will be used with the furler for other sailing trips.  Furler is sitting in a box here waiting to go!! (not approved for the challenge)   The shroud chainplates are set up for the standard rig with a single shroud as well as an extra fixing point for lower shrouds for extreme sailing conditions.  I will also put an inner forestay chainplate on the frame just aft of the bow which can be used as a fixing point for a safety harness when not used as  mast support.  I will put on an inner forestay and lower shrouds for the trip back to the Azores from  the Caribbean.  Done this trip before and had mostly light winds but got hammered in the last days. This Setka is getting heavy!!!  Going to do a weighing session soon.  Got to keep in the rules.!!  Next metal work project is the inside backing plate supports for the bottom pintle which is a Carter modification - hope they approve.


Also been messing about with the galley.  Im happy with the cooker gimbal plan so now Im trying to sort out shelves / storage etc.  Watch this space - it is going to EXPAND!  (I like my food)

 27th October

Been busy with another project but my 316L stainless steel arrived yesterday. 


Started cutting the rudder pintles from 8mm sheet.


Did some more cutting and drilling today.  Got to grind angles for the welding penetration and then weld it together.  Polishing compound somewhere in the Amazon postage system but not in a hurry.  At least I can mess around with metal work now when I get fed up with epoxy and plywood.