29th May

Tempus fugit. Close to one year since starting this project in earnest and the name is on!!!!


Still got to do the starboard side and the "eyes" on order.

Been playing with my welder and lathe trying to make a self steering system.  I am no expert but enjoying learning.  If there is something that I have not done before I have to try and learn how to do it.


Trimtab all mounted and bolted in position.  Is it the correct size?- f... knows - but all I know is it turns very smoothly with little friction.  Ready for glassing, filling, sanding ,priming, sanding , sanding and maybe a bit more sanding etc. Time will tell if my guesses are close.  Tab is 50mm from the front of the stock to the trailing edge (ie between 15 and 20% of cord of the rudder).  I will share all my experiments once I start sailing.


This is the start of the control system to operate the trimtab.  Had a big disaster because when I drilled all  the holes in the control arms my "6" mm drill bit was actually 6.4 mm diameter which gives .4mm play between every joint on my pins.  After several linkage points it all adds up to be a big disaster!!    My plan is to keep all play to a minimum and reduce friction as much as possible and make it bomb proof.  Drilling lots of holes in the bell cranks to give many options for experimentation.  Going to scrap all this and make new bits with less tolerance in the pins.  Cost - nada- just hours wasted and starting again.  Once sailing and tested  if I can get it to work well  I will make new bits that are the correct size for Nuts without lots of holes etc.  Sleepy time - off to bed Good Night.

 27th May

Went to Horta this morning to the graphics guy to order the name transfer.  As soon as that is on I can continue with the yacht registration.  (got to send photos)

Did a bit of welding preparing the trimtab stock. 


Welding the tabs deformed the 10mm stock a bit and had to bend it straight again.  Pacified the welds and roughened up the stainless where it will be epoxied into the tab.


All glued up on an aluminum straight edge on some parcel tape to stop it sticking.  Two strips of 5mm plywood epoxied over the tabs with lots of epoxy squished out.  Got to let it cure and can then shape and glass over, fill, sand, prime etc.


Doing a little experiment.  Epoxied some 3mm  dyneema into the same pine I used for the stringers in little loops.  Holes 15mm deep (stringers etc 22mm thick) and different sizes and epoxy mixes.  Going to do a pull test with my scale on my tractor to see if it is strong enough for using as tie down loops inside the boat.  I want to put lots of fixing points for tying stuff down inside.  Dont want a few anchors or batteries flying around inside in a knockdown. An alternative is stainless steel saddles with bolts or screws.  Screws only good for very light loads.  Going to leave this for at least one week to let the epoxy cure properly before testing.

 26th May

Several small things done in the last few days but nothing major.  Spent this morning on the sea catching trigger fish for the freezer.  Kept the 10 biggest caught in 1 hour and came home to watch F1.  The sea here is full of Atlantic Triggerfish at the moment but only keep what we eat.


Fitted locker doors to forepeak lkrs and galley lkr.  Made small stainless swivel catches to keep them closed.  Took a long time to cut, drill and polish but cost nothing.


First experiment with deck organizers.  Tested with rope pulled under load at an angle and it slides smoothly.  Just used a table saw, drill press and a router using 22mm wide annealed Pom which I cut from a big piece of round bar that I had.  A bit rough on the outsides  but routed holes very smooth.  12mm holes drilled and 9mm half round router bit used.  I left the ends square to drill mounting holes from the top for countersunk bolts but think I will round them off and drill from the bottom and tap a thread.  Delrin is great and strong with tapped threads and there will be no bolts from the top.  Maybe a bit of threaded rod with domed nuts on the inside to protect my head a bit.


Been messing around with a trimtab stock.  It will create drag and slow Nuts down a bit but if it works well I will be happy.  Im not keen to spend hours a day on the helm if I do not have to.  Far prefer to put my feet up and read a book with a nice cup of tea.


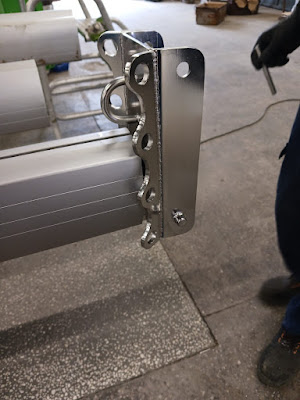
This is the start of the mid bearing construction.  It consists of 2 pieces of delrin bolted together with a 10.5mm hole drilled through on the join.  The idea is that I can remove the bearing (which is in two halves) from the shaft once the bellcrank is welded on the top.  The bearing at the moment is 30mm long and I will drill out a part of the length from the bottom (and maybe the top as well) to reduce the friction but needed it this size for strength of mounting.


The mounting on the top of the rudder also has a split delrin bearing with the possibility to remove it for replacement  or modification.  It is also 30mm thick but will be overdrilled from the bottom to leave maybe 10mm or less of bearing surface.  There will be very little force on this bearing surface so it might as well be tiny to reduce friction.  You see 4 holes on the foreward side of the bracket.  There are 6mm nuts welded on the underside of each hole.  These are potential fulcrum points for the bellcrank connection to the windvane.  The position of the fulcrum will determine the amount of feedback to the trimtab.  Lots of experimenting to do but hopefully keeping many options open.  All still very rough but a work in progress!


 23rd May


Rudder pintles final bolting with sealer.  Happy as very smooth with no binding spots from lock to lock and no rattles. Also made a delrin washer to take the weight so no stainless steel on stainless steel friction (except for the 12mm pins).  After mounting  - rudder removed and hull dropped down to level again.  (Have to jack the stern up about 40cm for fitting the rudder)  Bought a 316 stainless shaft for trimtab (10mm dia solid) and busy making gudgeons for mounting.  Will have split delrin bearings if I can figure out how to make them so they can be removed easly.  Lots of hours and not much to see.  Going to try make a horizontal axis windvane driving a tab on the rudder.


Bolted in deck hatch to have a break from stainless work.


My mast step under construction.  Hopefully mast and boom will be ready for packing for shipping from Poland tomorrow.

 21st May

Shops open so got clear silicone for windows.


All fixed and sealed.


Some foam removed from aft compartments to bolt in the sea anchor fixing points.  Long arms needed to reach the washers and nuts with Mrs Nuts on the outside with the spanners.  All squished and tight!


Bow chainplate and Ubolt fixed and sealed.  Also a bit of a mission needing long arms but all nice and tight and foam flotation reinstalled.  Ubolt installed just above sealed compartment and easily reached from the deck for attaching an anchor strop to keep stress and chafe away from the deck.


Companionway washboards fitted with small window to check for ships etc -  ie- if it is raining -go back to bed (5mm Lexan of which I have heaps so might as well use some).  Not planning to make swivel brackets for navigation equipment for outside viewing.  Just need my compass and if wanted can put a tablet or phone with Navionics in a waterproof cover in the cockpit if approaching an anchorage in the rain at night.  Never had that luxury in my past sailing life so wont miss it.

 19 th May

Big festival weekend here in the Azores.  Just home from testing fermented grape juice and watching live music.

Spent some time in the the last 2 days preparing bits to be fitted to the painted hull.


All the plasticine removed from the holes (didnt want paint spray going inside) and fitted stainless steel fittings to mask in preparation for sealing and bolting on.


.Windows pre fitted and masked all ready for sealing in.


Stainless steel straps for a sea anchor also masked (as well as shroud chainplates - no photo)  and ready for sealing and bolting into position.


Washboard window sealed and bolted into position.  Need more clear silicone for mounting cabin windows so they are on hold till shops open. Stainless steel fittings getting sealed with polyurethane sealant which I have but want to do the windows first as the chainplates are very close to the forward windows.

 17th May

Weather was damp with high humidity the last 2 days so Nuts just hid inside the workshop.  This afternoon it was sunny and dry so jumped into action.


Only two little runs that you wont find if I dont tell you where they are! 

After the second coat had a couple of hours to dry I ripped off all the masking.


Just need the name on the side and some eyes in the bow.  A boat cannot see where it is going without eyes!!


Rudder also got its "Go Fast" stripes.

 14th May

The weather was as good as expected with just under 60% humidity and the wind was blowing above my workshop so got my spray stuff out.


First coat going down.


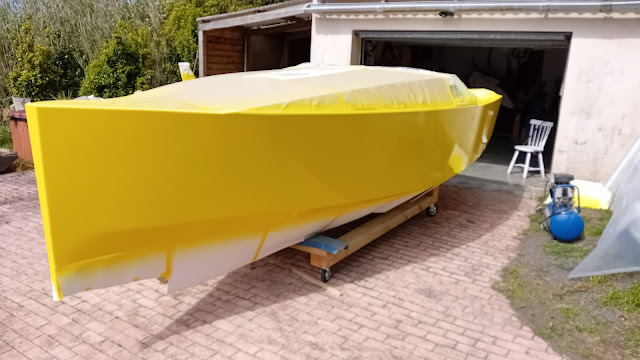
First coat done before lunch and this final coat sprayed at 3pm (finished at 4.30pm).  Finish about a 7 out of 10 so very happy for an amateur spray painter.  Only one fly got stuck!!  Going to let the PU paint cure for a bit before taping up for the boot top stripe plus some other bits.  Wait a day or two and you will see the final color scheme and design.  Maybe a bit odd?

One interesting thing - Nuts got a lot smaller when pushed out the workshop.  It seemed a lot bigger than 5m when upside down building the hull then shrank a bit when turned over and got a bit smaller after the deck was put on.  Im sure it will shrink a lot when put in the water.  Hopefully the Orcas off Portugal will not be interested in a minnow. 

 13th May

Been busy doing house and garden maintenance the last few days.  Did prepare Nuts for painting - hopefully starting tomorrow.


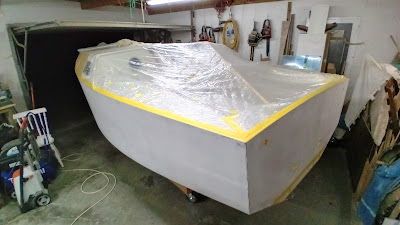
All masked and ready for first spray session.  Forecast for 60% humidity (which is low for here) and hopefully wind not too strong for spraying.  Wind dropping later in the week but humidity supposed to be going up.


Routing some flats on round stock Delrin so I can cut some flat pieces on the table saw to try and make a deck organizer.  A bit of a waste but it is what I have.

 10th May

Been busy in the garden and doing spring chores on our property.  Decided not to spray Nuts in my workshop inside a plastic tent.  Too many fumes in a small volume.


Nuts went on a short voyage and machines had a shuffle.  Just got to mask the cockpit and all ready for spraying.  Weather should be good for outside spraying next week.  Easy to push Nuts out and back into workshop.


 8th May

In Horta today so popped into the marina to check my little fishing boat and admire Clarisse's IMOCA.


Chatted to a team member and hopefully her bulkhead will be fixed for a Friday restart. I take my hat of to these super human skippers.

Weather going dry for some time (hopefully) so my tractor ventured out from storage.  Rigged up scale and did some testing.


First pull was on 3mm Chineema with an eye splice on each end connected with  BIG shackles. 20mm pin diameter.  (not in this photo)


BIG bang over the limit of my scale.  1039kg!!

Then rigged up a 2 to 1 tackle system for the cable and 6mm Chineema tests. Hydraulics peaked at just over 1050kg on the scale and did nothing to the 5mm ss strop with a copper sleeve with thimble on one end and wire splice with copper sleeve over the tail without thimble on the other -  both ends connected with 10mm ss shackles.  6mm strop with copper sleeves on thimbles on each end also stalled out my hydraulics.  6mm Chineema with very short buried tapers and eye splice on each end and connected with 20mm shackle pins also stalled out hydraulics.  I estimate there was at least 2000kg force applied (doubling up the scale readings.)


What was interesting is the thimbles got squashed and I bent the pin in the 10mm shackle.  


These are all the bits I tested.  I am happy that the cheap hydraulic crimper seems to do the job very well with no slip or movement in the sleeves.  I did not do a pretty job of the crimping as it is a 3 handed job but will borrow Mrs Nuts for the final crimping.  I hit the 6mm Chineema with a hammer when under heavy tension and it was like hitting solid steel.  Very impressed. 

I might ask a friend with a monster tractor to break the strops without the scale (dont want to break it) just to see where they come apart.  Could probably lift up 3 of these boats with just 1 cable!

 6th May

Great day hiding in bed from the rain this morning surfing the net but  had to settle accounts so ventured out.  Got  to keep my accounts sweet by prompt payments.  Very wet day so not much happened.  Did remove rudder and drilled out bolt holes for filling.


Over drilled holes saturated with neat epoxy and then stuffed with fiber and silica filled epoxy.  Going to let that cure for a while and then refit the rudder and redrill the holes in the middle.  Bolts 10mm dia and epoxy holes drilled to 17mm so should have at least 3mm solid epoxy sleeve around the bolt.


Gave the tiller mounting straps a bit of a wizz on the polishing linen wheel.  A bit more shiny but Hey Ho five out of ten is good enough for me. (life is short)


Put the tape on the port side in the prep for spraying the hull.  A bunch of masking to do still but weather is still iffy till maybe Thursday.  

My buddy Jeff stirred up my brain so got to maybe order some goodies for sideways thinking.  He didnt build eleven thousand boats because he is stupid!  Retired now and busy finishing another world cruiser for himself.

My boat spraying experience is about 1 on a scale of 10 so should be fun. Never too old to learn though!!

 5th May

Lazy Sunday morning and spent hours chatting to my friend Jeff from way back in Capetown.  Got lots of good ideas from him.

Did a bit of Stainless Steel polishing on pintles and jacked up the cradle high enough to test mount the rudder.


Tiller fitted at a good angle for my taste and rudder is nice and free turning from lock to lock with no rattling or binding so pintles must be lined up OK.  Now can remove it all and overdrill the bolt holes and epoxy fill for redrilling and do a bit more polishing.  Crappy rainy weather tomorrow so good for polishing stainless and starting to think about trim tab.